This post is to show step by step process on how to launch an AWS EC2 instance in a Subnet within a custom VPC. Since most of the steps are the same as launching the EC2 Instance wizard in AWS we will only be focusing on the selection of the VPC.
First login to the AWS management console and from services select EC2 and from EC2 dashboard select Launch Instance

Step 1: Choose Amazon Machine Image (AMI)
Choose the Image that is appropriate for your Architectural design or as per your company standards. In this demo, we are going to select Amazon Linux 2 AMI (HVM), SSD Volume Type which is Free Tier eligible.
Step 2: Choose Instance Type
Here also you can choose the type of instance that is in Architectural design or as per your company standards, but for this demo, we are going to select free tier t2 micro. Then press Next Configure Instance.
Step 3: Configure Instance Details
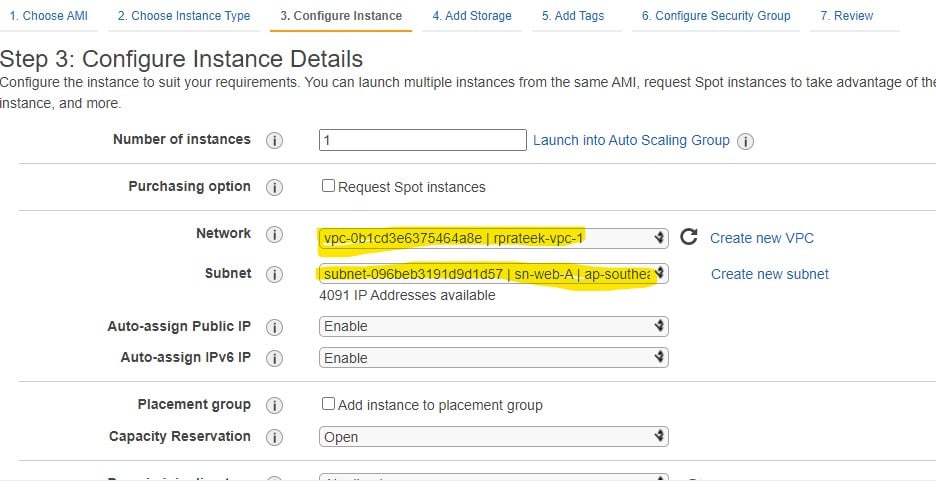
In this section specify how many instances you want to launch, in our case we will be launching only one instance.
Next on Network from the dropdown select the custom VPC that you created and then the subnet where you want to launch the EC2 instances. If you want to learn in detail about how to create a VPC and subnet or how to setup a custom VPC and host multi-tier website in AWS you can checkout the link below.
In Auto-assign Public IP & Auto-assign IPv6 dropdown you can enable it for auto assigning IP addresses or use the Subnet settings. That means while creating the subnet if you have enabled Auto-assign Public IP then it will automatically inherit from the subnet setting.

Keeping all options intact Press Next: Add Storage
Step 4: Add Storage
You can select the storage that you have designed in the Architectural diagram or as per your company requirements. In our demo purposes we are going to use default storage and press Next: Add Tags
Step 5: Add Tags
You can add tags as per your naming standards, tags are just the names that can be used to identify the EC2 instance. eg. corporate-ec2-HR01
Step 6: Configure Security Group
This is the important section of launching the EC2 Instance. If your company has a security group configured then you can use it as per the security requirement for the EC2 instance that you are going to use. In our case, we are going to create a new security group and give it a name and keep everything as default. By default, this security group is allowing TCP connection from all IPv4 and IPv6 addresses. Press Review and launch to launch the instance.
Step 7: Review Instance Launch
In this section, you can revisit all the configurations and selections that you have made along the way, make sure all the configurations are correct, and press the Launch button.
AWS asks for the Key pair, if your organisation already have a key pair then you can use those or create a new key pair. Key pair are generally a public key that AWS stores, and a private key that we store. Together the key pairs allow us to connect to our instance securely. For Windows AMIs, the private key file is required to obtain the password used to login into our instance. For Linux AMIs, the private key file allows us to securely SSH into our instances. We must keep the private key securely so that we can use it while connecting to the instance.
For this demo, we are going to create a new key pair and download the key pair. A .pem file is downloaded, make sure to keep the file securely as we will need this file to connect to EC2 instance later on. Then at the end press Launch Instances. Now your instance is launched and can view the instance in the list of instances in EC2 dashboard.

Now you can see the Instance has got its Public and private IP associated with it and is ready to use

Let’s connect and test the instance using a local SSH connection.
To open a SSH connection locally to the instance, select the instance right-click and press connect.

We can use EC2 Instance connect that will SSH into the instance using the web console which will be more than enough for us to test the instance. We have to make sure public IP is associated and use the default Username ec2-user and press connect.

Now you are in the EC2 Instance.
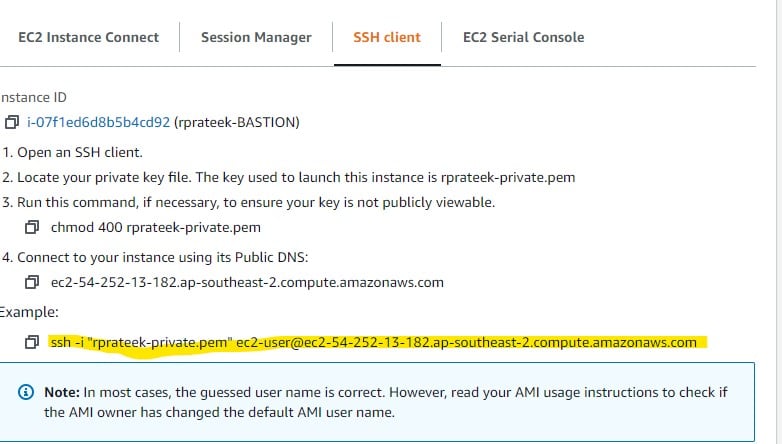
Similarly, if you want to connect to the EC2 Instance using SSH client you can select the tab SSH Client where you can get the link to use in the SSH under example:

If you copy that in your clipboard and move to your terminal or command prompt and paste the link, remember the .pem file must be in the same location where the command prompt is open. In our case, it should be under C:\Users\Acer. Now you have to type in Yes and press enter and you are in your EC2 instance successfully.

The scope of this post ends here hope you got a basic understanding of how you can launch an AWS Ec2 Instance in a custom VPC subnet.
[…] How to launch an AWS Ec2 Instance in a custom VPC subnet? […]
[…] How to launch an AWS Ec2 Instance in a custom VPC subnet? […]