A trading journal is an important tool for stock trading, whether you are a beginner or a seasoned investor. All great traders have maintained years of trading journals. They reviewed their trades to find weaknesses and improve their performance. Below are some solid reasons to have a trading journal and automated trading history would have helped:
Tracks Performance and Identifies Patterns
A trade journal helps you record details of your trades. It includes entry and exit points. It also covers the rationale behind the trade and the outcome. By analyzing this data, you can find patterns in your trading behavior. This analysis can highlight strengths and weaknesses in your strategy.
Improves Decision-Making
Documenting trades can give the right entry rules and helps avoid impulsive or emotional trades, leading to more disciplined trading.
Enhances Strategy Development
By reviewing past trades, you can decide which strategies work best under specific market conditions. This process helps you refine your approach to improve profitability.
Builds a Learning Archive
A journal serves as a personal database of trading experiences, mistakes, and lessons learned. Over time, this archive becomes an invaluable resource for improving your trading skills. It can also be very valuable for future learners. They review the mistakes you made. This helps them avoid those mistakes to speed up their learning curve.
Helps Manage Risk
Reviewing historical data allows traders to evaluate risk management practices, like stop-loss levels and position sizing. This ensures that risk is aligned with overall trading goals.
Supports Tax Reporting
A detailed trade journal simplifies tax reporting by keeping a precise record of profits, losses, and deal details. As you start making consistent profits, you must declare the profit and loss correctly. This is very important to avoid any penalties or fines from the Tax office.
Why Keep Trading Journal?
Keeping a trade journal is a simple yet powerful habit that can significantly enhance your trading performance. It provides clarity, promotes learning, and ensures disciplined decision-making, making it an indispensable tool for success in stock trading.
Many paid online tools are available for creating trading journals. Most trading accounts allow you to access your trading history. I’ve tried several tools in the past, but none truly met my needs. Some were overly complicated, while others, like Excel-based templates, required too much manual effort to manage effectively.
Over time, I ended up with multiple trading journals and scattered stock charts images across my hard drives. This disorganized system not only hurt my trading performance but also led to emotional trading habits. Eventually, I decided to take a break, go on holiday, and step back from trading.
I made a fresh start when I returned. I designed a simple stock trading entry system and an automated trading history using Google Forms and Google Sheets. After refining the setup multiple times, I now have a hassle-free setup that lets me log trades easily. This setup automatically organizes my trading journal. It stores all my chart images in Google Drive. This keeps everything streamlined and stress-free.
Then I also designed an automated stock screening system for trading which I have explained in this post: “Importing Data from FinViz Stock Screener to your Google Sheets“
I’d like to guide you through creating a simple stock trading entry system. We will also make an automated Trading History Using Google Forms and Sheets. I will show you in just 7 steps.
Step 1 – Login to your Google account and go to Google Forms, select Blank Form
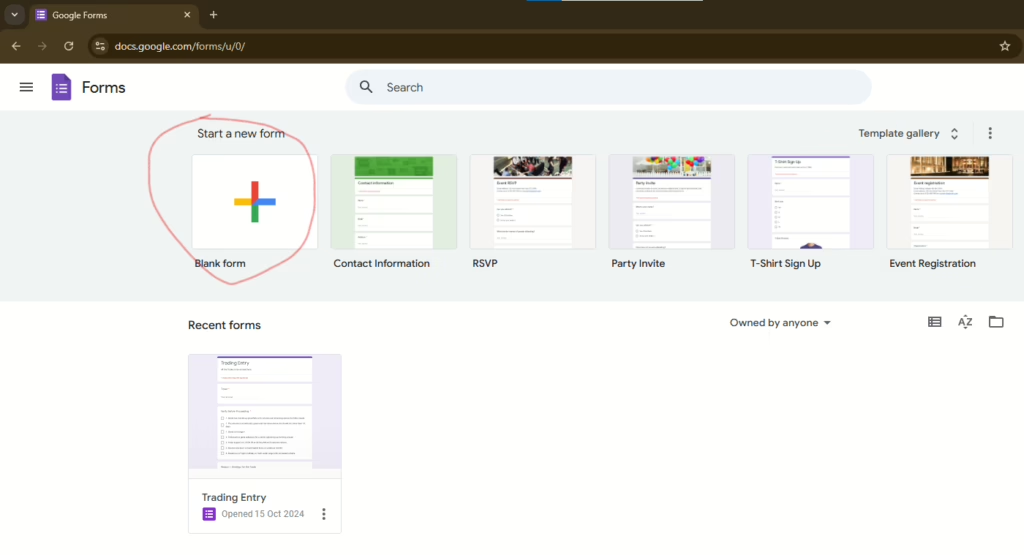
Step 2 – Prepare your form for Trade entry
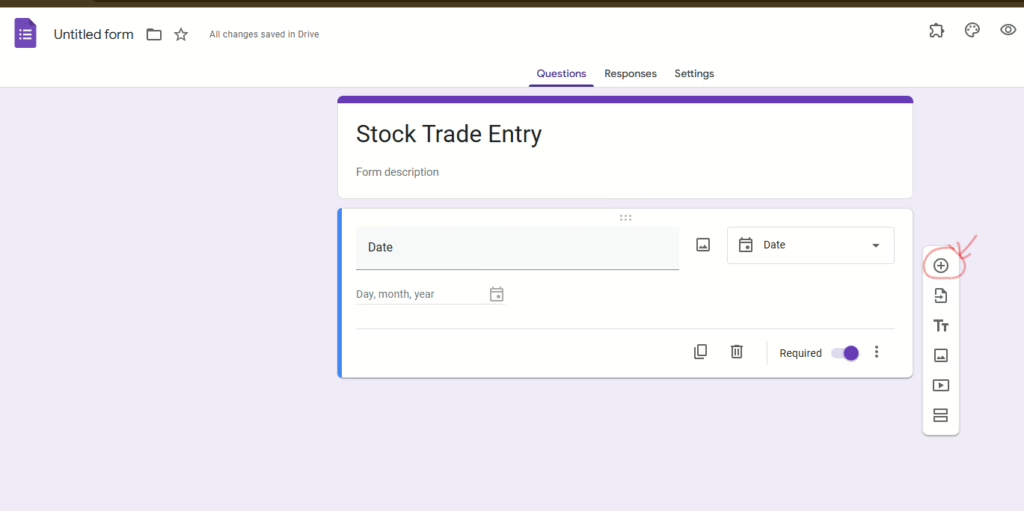
Give the name of the form, I have called it “Stock Trade Entry” .
If you want a description, you can provide some context or instructions; however, I have skipped it for now.
Next in the Question label type Date and from the dropdown select Date, and select the Required bar.
At this point, your form should look like the example below. Next, press the Plus button to add the next question.
On the Next Question Type “Ticker”, and select “Short Answer” from the dropdown on the right. Make it required as well. Next, press the Plus button to add the next question.
In the next question, I aim to confirm a set of trading rules before proceeding with a trade.
This approach promotes discipline in trading and helps avoid emotional or revenge-driven decisions by adhering to these rules. Additionally, we should plan to document the rules followed during trades in a journal. This will allow us to evaluate their effectiveness over time.
Let’s label this section “Trading Rules” and use checkboxes in the dropdown for choice.
Add your required trading rules, For this demo I will have the next rules
Stock is in Stan Winstein Stage 1 Uptrend
10 EMA is above 20 EMA
20 EMA is above 50 EMA
Make it a required field, which means you must select at least one trading rule.
Next, press the plus button to add one more question.
In this question, I will add a free text field. I would like to explain the reasoning or the strategy for the trade. I call it “Reason + Strategy for the Trade”. Then, select the paragraph from the dropdown.
Next, press the plus button to add one more question.
Call it “Cost Price” and select the short answer from the dropdowns and make it required field.
Next, press the plus button to add one more question.
Call it “Stop”, and select the short answer from the dropdowns, and make it a required field.
Next, press the plus button to add one more question.
Call it “No of Stocks”, and select short answers from the dropdowns, and make it a required field.
Step 3 – Set up the Stock Chart Image Upload feature to upload chart images to Google Drive.
Press the plus button to add one more question. Call it “Screen Capture of the Trade” and select file upload from the dropdowns.
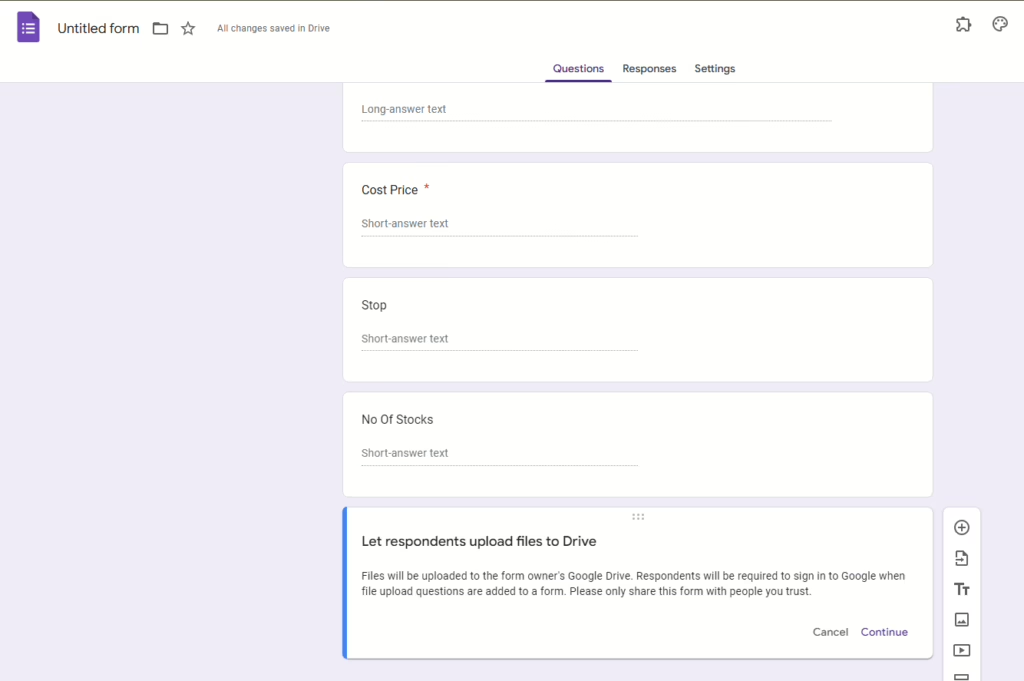
Click Continue
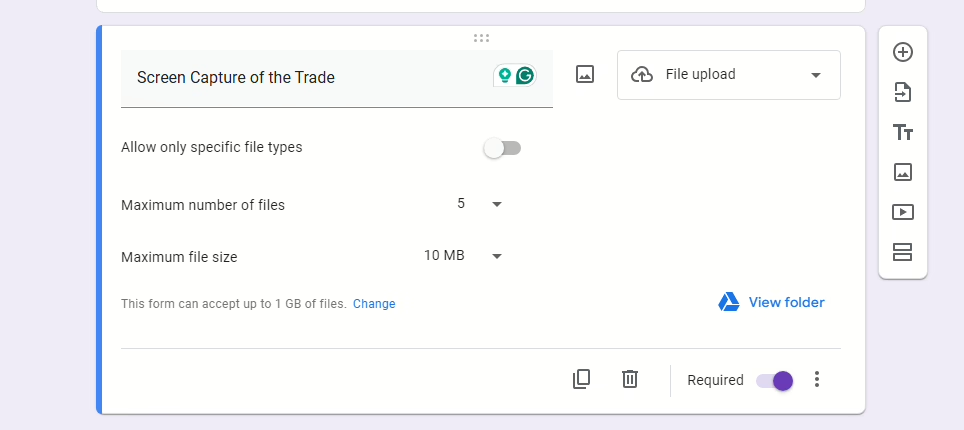
Click View Folder to check the location in Google Drive where the image files will be stored.
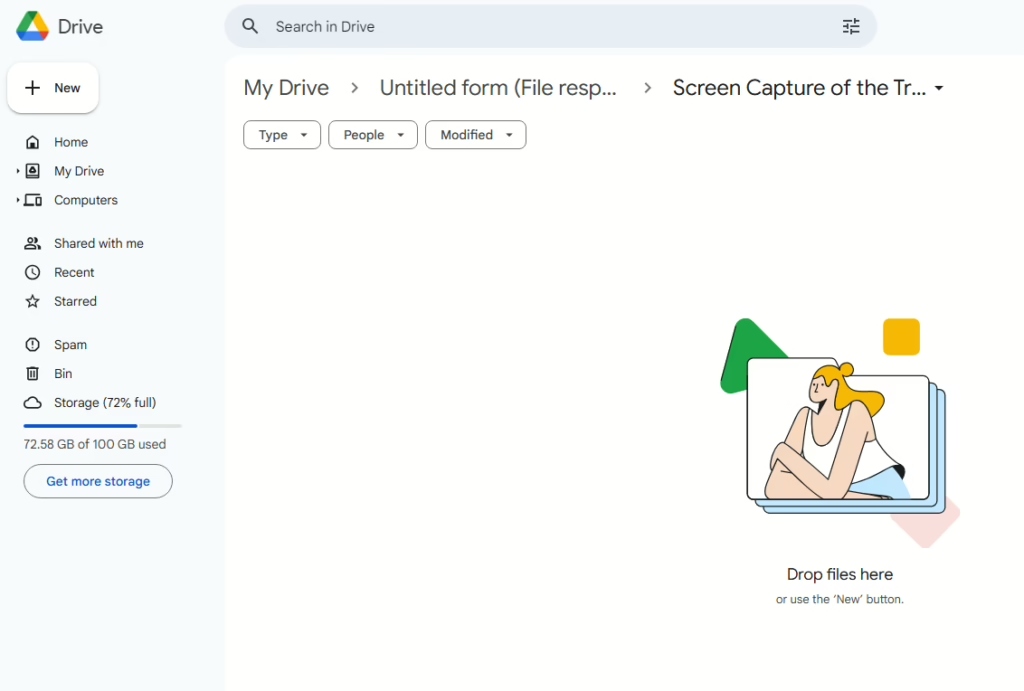
Step 4 – Set up the Google Sheet to record the Trade Entries.
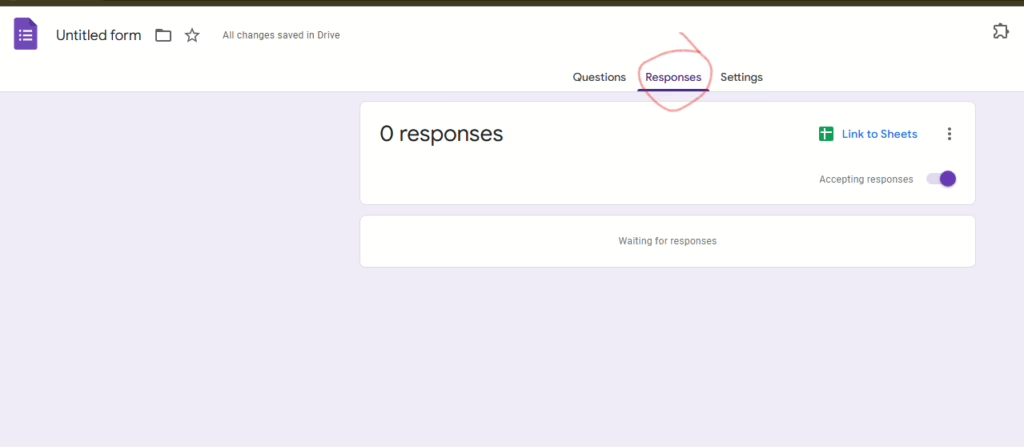
Navigate to the Responses tab to link the Google Form with Google Sheets, ensuring all trade entries are recorded systematically.
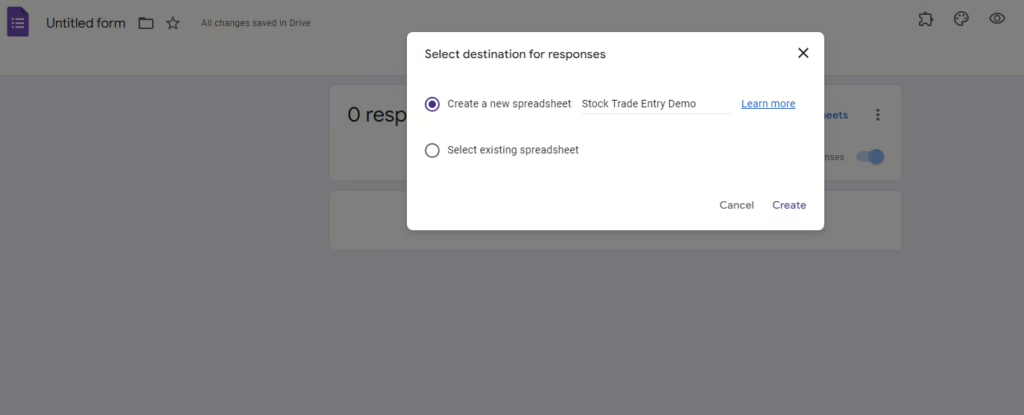
Click the link to the sheets and give the name of the sheet. For this demo I am giving the name “Stock Trade Entry Demo” and press create.
Now the Google trading entry form and the Google Sheet for recording the trades are ready.
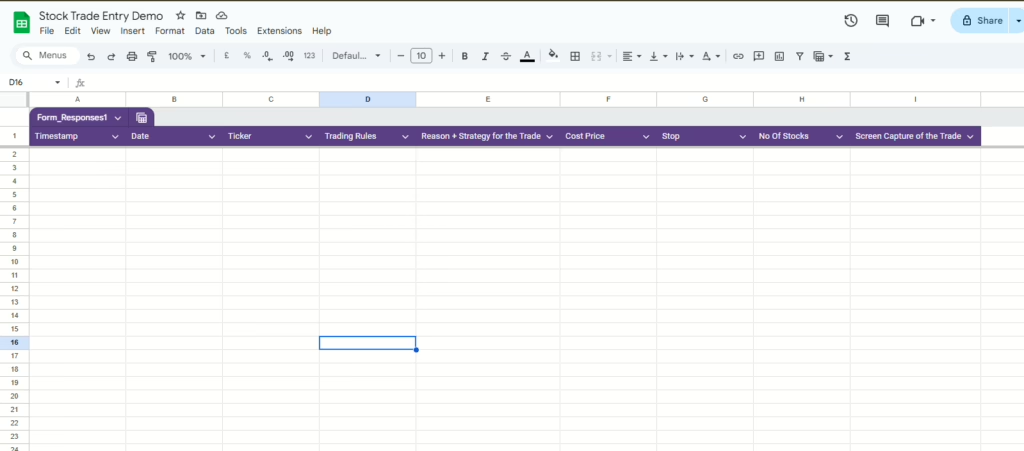
Step 5 – Finish the trading form and test the trade entry.
Go back to the form and click send to get the link to the entry form.
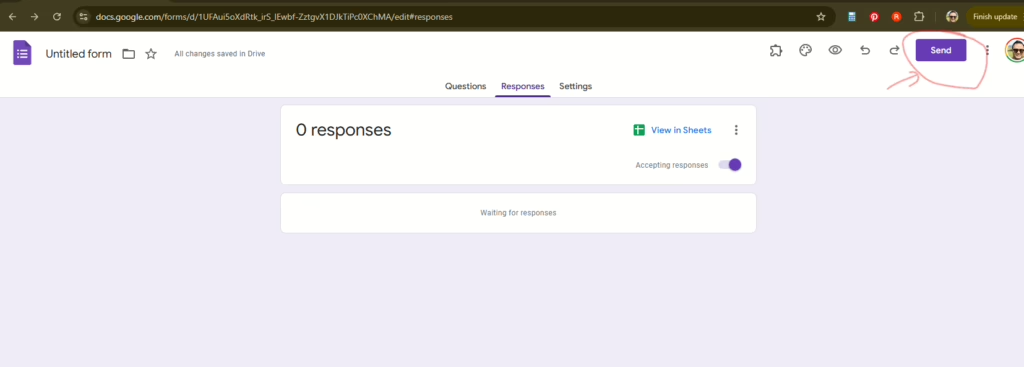
I noticed the name was appearing as “Untitled Form”. But, when I clicked on it, it reverted to the name we provided.
On the Send form select the link tab, click shorten URL, and copy the link.
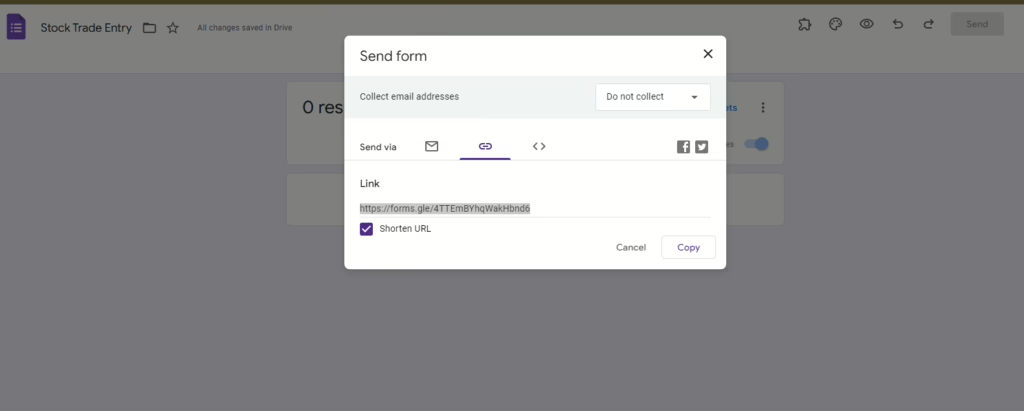
Open the URL in a new tab to access the Stock Trade Entry form. Be sure to bookmark the link for future use.
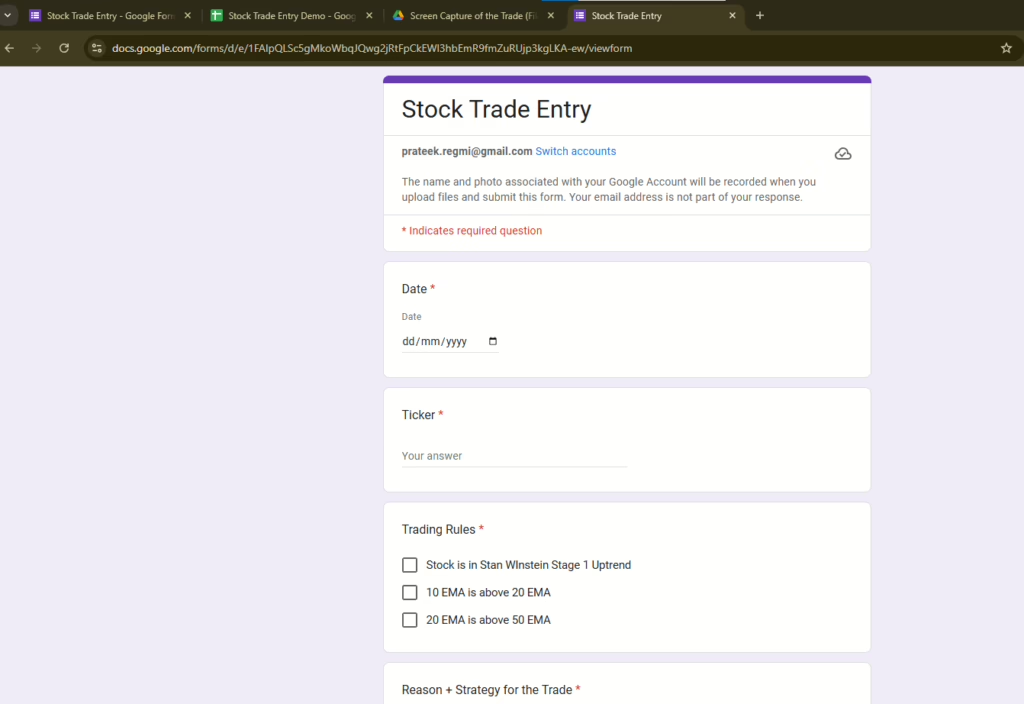
Enter a sample trade to confirm how it shows in the Excel sheet and find where the image is uploaded. Fill in the form.
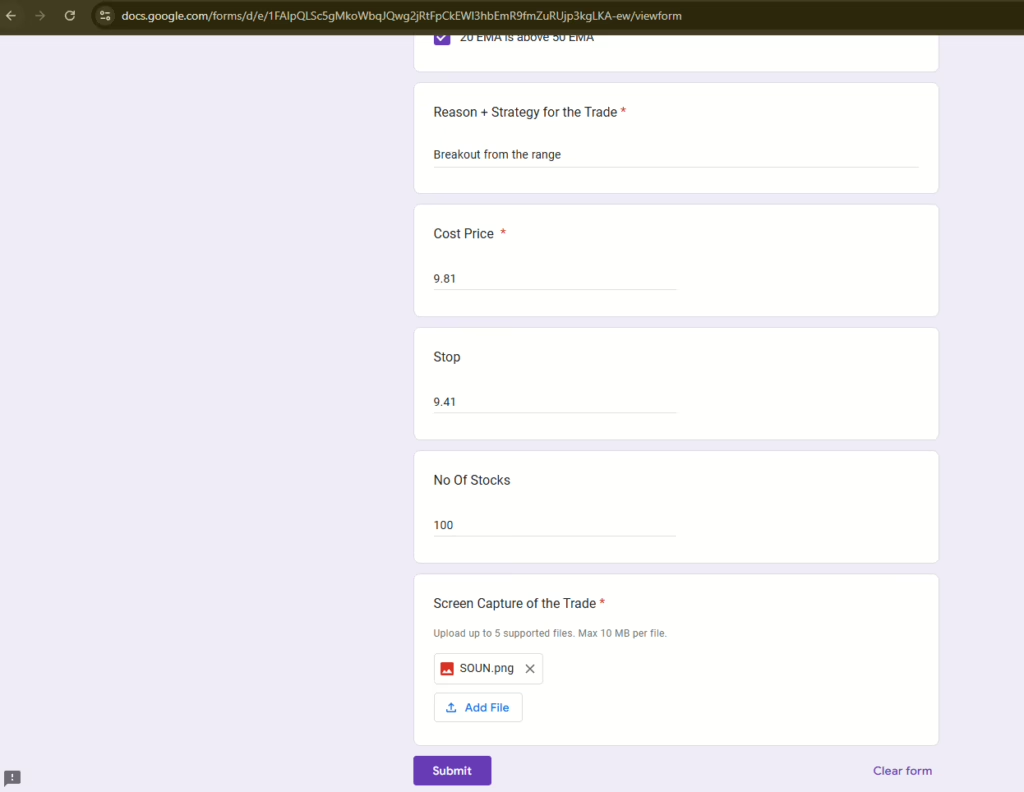
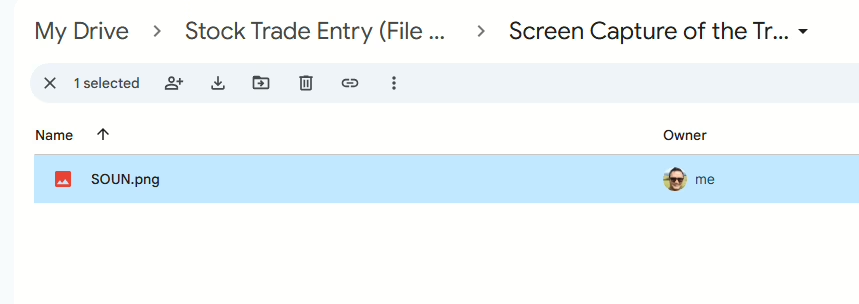
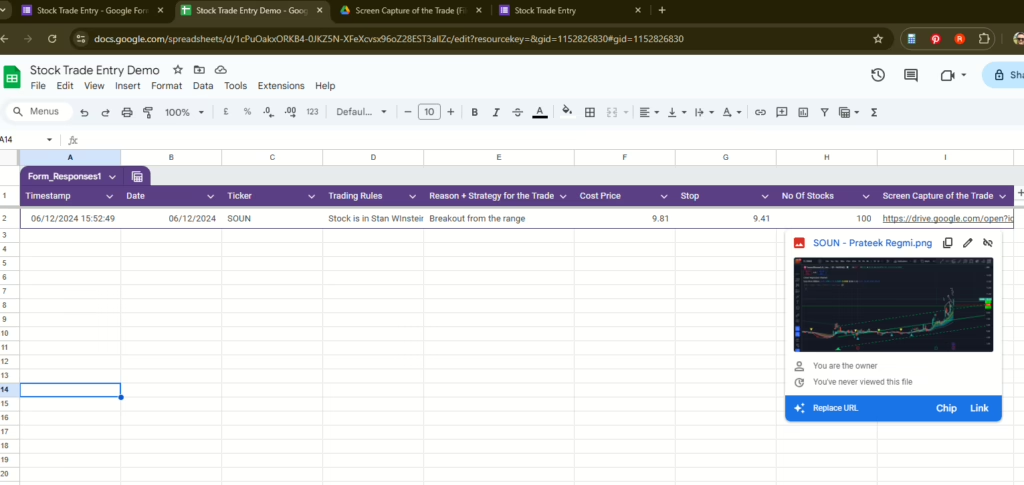
Click send and verify the spreadsheet to verify the trade entry is recorded with the image link attached. The image is successfully uploaded to the designated Google Drive folder
Here you can see the image file in google drive.
And the Google Sheets trading journal looks like this.
Step 6 – Improve Trade Entry Google Sheet to Capture “Exit Price”
I’m not just looking to keep a record of my trades. I also want to calculate the cost of each trade. When I close a trade, I need to log the exit price. I also need to automatically find the profit or loss from that trade.
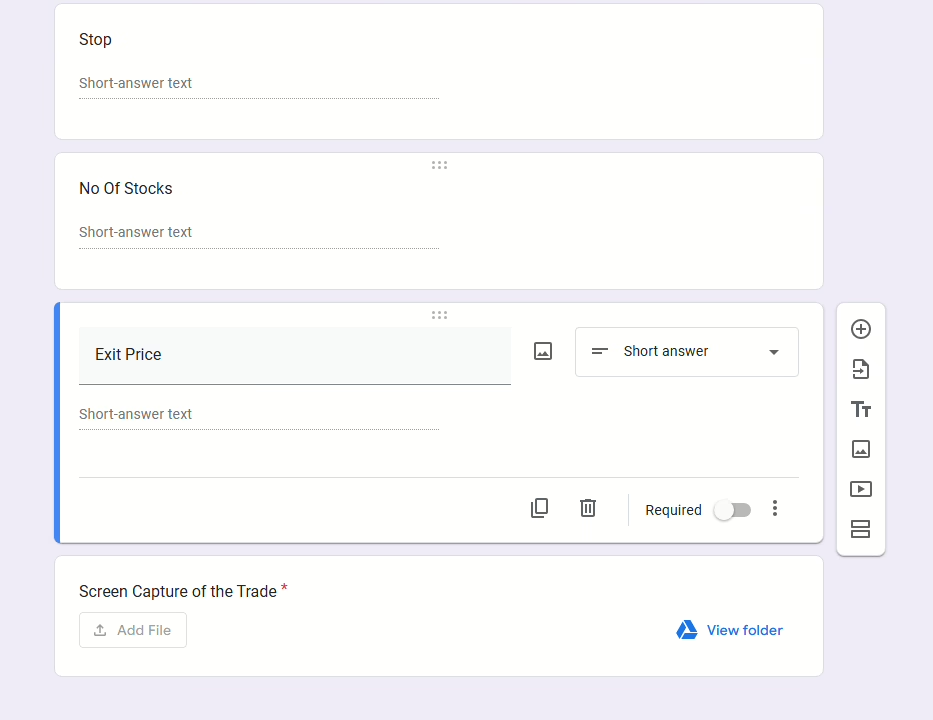
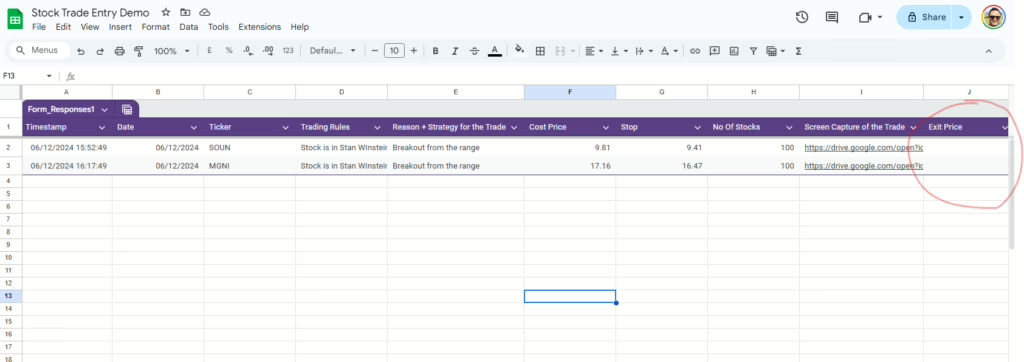
I realized that the current setup doesn’t include a field for the exit price. The exit price isn’t needed when entering a trade. But, we still need a blank column in the spreadsheet to insert it later.
To tackle this, we can take several actions. First, update the form we created earlier. Add a new, optional field called “Exit Price” right after the “Number of Stocks” field. This field will stay blank during the first entry and can be filled in once the trade is closed.
Let’s try entering one more trade and check the spreadsheet if “Exit Price” is captured or not.
Step 7 – Create a “Trading History” spreadsheet
Let’s create a new sheet dedicated to maintaining a comprehensive trading history.
This sheet will calculate the profit/loss and the gain/loss percentage for each trade. We’ll name it “Trading History”.
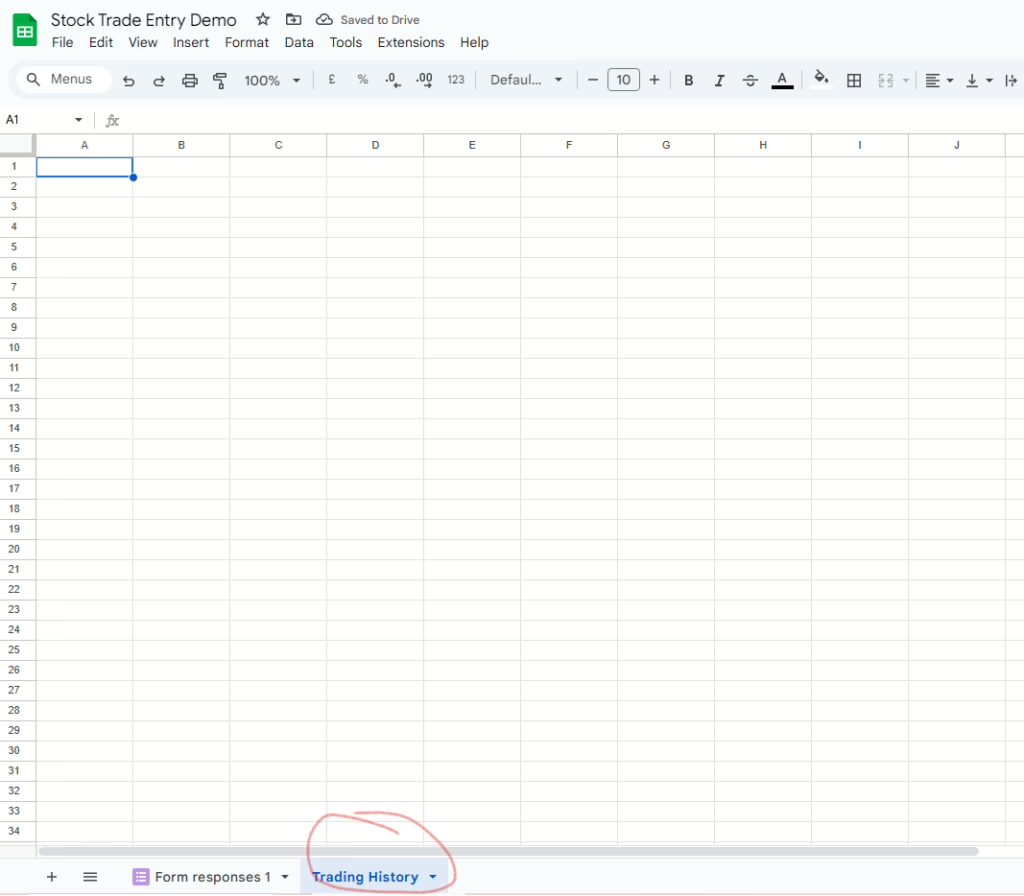
On Cell A1 Enter the next Formula to import the values from the Form Response Sheet.
=IMPORTRANGE(spreadsheet_url, range_string)
First part of the formula is Spreadsheet URL. Go to the Form Response sheet. On the top right, click the drop-down on “Share” and select “Copy link.” Paste this link to the first part of the formula within quotes.
This should look like below: (note the URL link value will be different for you)
=importrange("https://docs.google.com/spreadsheets/d/1cPuOakxORKB4-0JKZ5N-XFeXcvsx96oZ28EST3allZc/edit?resourcekey=&gid=1152826830#gid=1152826830","Form responses 1!A1:J103")
Remember both URL and Range string values to be within quote ” “ else you will have an error. Also remember to import the range only up to the value filled by the form.
The Trading History sheet will look like the next:
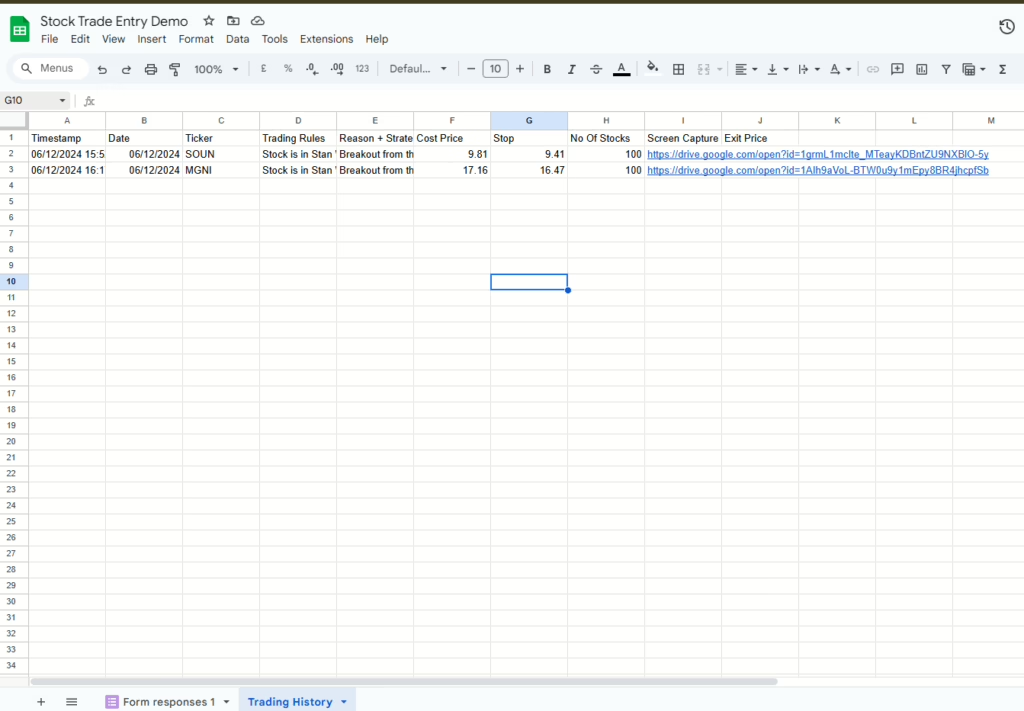
Let’s now add extra fields in Trading History Sheet that will serve us well in future.
I will add the next columns after Exit Price.
Cost Basis
Revenue
Profit/Loss
% Gain/Loss
Comments After Close
Let’s put Exit Price on the first trade to set up the correct formulas on the required columns. For that go to Form Response sheet and enter 10.00 for SOUN trade.

Let’s go back to Trading History Tab and enter these formulas on Row 2 of the corresponding columns.
Cost Basis    =F2*H2          (Cost Price X No of Stocks)

Revenue  =H2*J2  (Exit Price X No of Stocks)

Profit/Loss =IF(L2>0,L2-K2,"") (Revenue - Cost Basis) (Note, I have embedded additional formula so that when there is no exit price then it shows empty)

% Gain/Loss =  =(M2/K2)*100 (Profit/Loss by Cost Basis X 100)
Comments After Close is a free field. You can write down what went well or badly in the trade. Use it for your own records.
Here you have it, A perfectly automated trading history Using Google Forms and Sheets! As soon as you log a trade, the sheet is updated instantly.
When you close a trade, simply enter the exit price, and the sheet will automatically calculate your Profit/Loss and %Gain/Loss. Isn’t that amazing?

!! BONUS !! – Add Touch of Style
Let’s add a touch of style! If a trade results in a profit, the cell will turn green. If it’s a loss, it will turn red. This visual cue makes it easier to quickly assess the performance of your trades at a glance.
Go to Format –> Conditional Formatting
Apply to Range: M2:M105
Format cells if : Less than 0 change the color of the cell to red
Done
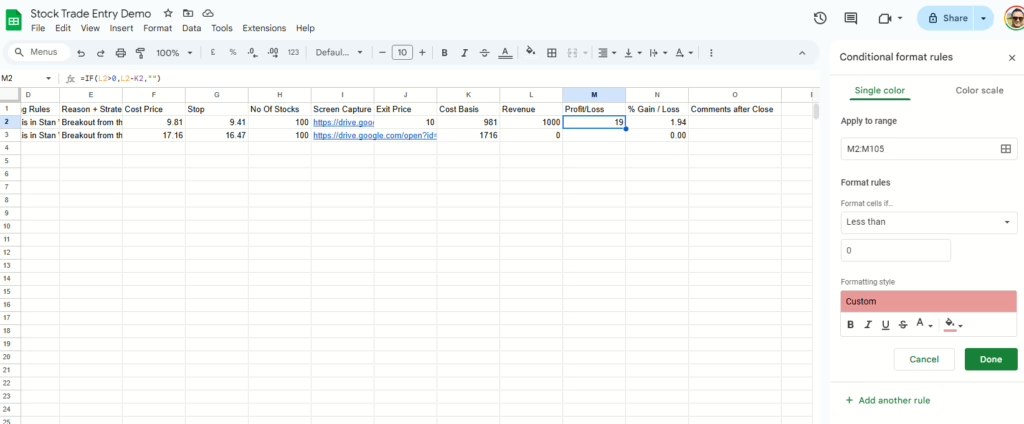
Add Another rule
Apply to Range: M2:M105
Format cells if : Greater than 0 change the color of the cell to default Green.
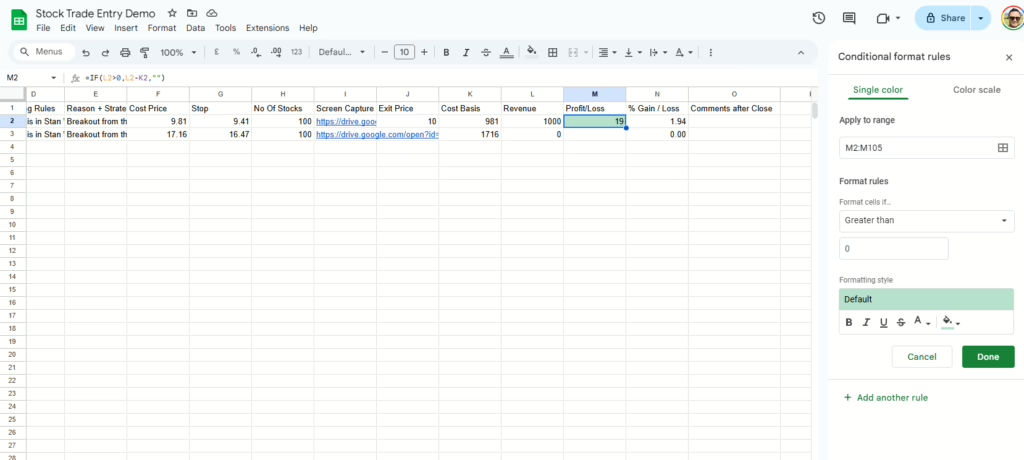
Here you go !!! A perfect Automated Trading History Spreadsheet – Now Transform Your Stock Trading with an Automated Trading History Using Google Forms and Sheets